Introduction
In the ever-evolving landscape of application development, security remains a paramount concern. As organizations increasingly leverage cloud-based services like Microsoft Dataverse to manage and store their data, implementing robust authentication mechanisms becomes essential. One powerful approach to fortify the security posture of .NET Web Apps is the integration of Managed Identity for seamless and secure access to Dataverse.
This article delves into the intricate details of authenticating with Dataverse using Managed Identity in .NET Web Apps. Managed Identity offers a streamlined and secure means of authenticating applications without the need for explicit credentials, reducing the risk associated with credential management and enhancing overall system resilience.
As we navigate through the intricacies of this authentication method, we’ll explore the benefits of Managed Identity, and provide a step-by-step guide on how to implement it within the context of .NET Web Apps. Whether you’re a seasoned developer looking to enhance your application’s security or a newcomer eager to understand the nuances of Dataverse authentication, this article serves as your comprehensive guide to a more secure and efficient web application development experience.
Server side Dataverse authentication mechanisms
There are a number of ways in which server side Dataverse authentication can be achieved which include the following.
- ClientID-Secret based authentication
- Certificate based authentication
- Managed Identity based authentication
The ClientID-secret and certificate based authentication requires credential to be managed, and credential management has following challenges.
Challenges in Credential Management
- Risk of Credential Exposure: Credentials are susceptible to leakage or theft.
- Source Control Oversight: Accidental check-ins of credentials into source control can occur.
- Expiry and Renewal: Periodic replacement of credentials may be necessary due to expiration.
- Compliance Demands: Compliance requirements may mandate automatic credential rotation.
- Lifecycle Management Complexity: Managing the lifecycle of credentials poses challenges, including security risks if not properly cleaned up.
- Manual Cleanup Requirements: Manual deletion of credentials after use is often necessary.
- Key-Vault Security: While credentials can be securely stored in a key vault, access to the key vault itself requires meticulous management..
Another option is to use Azure Managed-Identity, which doesn’t requires credential to be managed.
In this post we will talk through about what is managed identity and why this the preferred way of authenticating to Dataverse for apps deployed in cloud.
What is a Azure Managed Identity?
A Managed Identity offers Azure resources the capability to authenticate with other Azure resources that support Azure AD authentication, eliminating the need to handle and manage credentials. For instance, an Azure App service can authenticate seamlessly with Azure storage using managed identity. The adoption of managed identity helps in circumventing the administrative overhead associated with credential maintenance.
Advantages of Managed Identity-Based Authentication Compared to Credential based methods:
- Minimal Administrative Effort: No need to manage credentials, reducing administrative workload.
- Elimination of Secret Loss Risk: Managed identity mitigates the risk of losing sensitive secrets.
- Key Rotation Unnecessary: Unlike some authentication methods, managed identity eliminates the need for regular key rotation.
- Prevention of Source Control Mishaps: The risk of accidentally checking credentials into source control is nullified.
- Cost Efficiency: Managed identity incurs no additional costs, providing a budget-friendly authentication solution.
- Credential Management Eliminated: The necessity to actively manage credentials is completely alleviated.
Types of Managed Identity
Managed identities comes in two forms: system-assigned and user-assigned.
System-Assigned Managed Identity:
- Automatically created as part of the Azure resource provisioning process.
- Ceases to exist when the associated Azure resource is deleted.
- Non-transferrable and dedicated to a single Azure resource.
User-Assigned Managed Identity:
- Operates as an independent Azure resource.
- Possesses its own lifecycle and requires separate deletion when no longer needed.
- Facilitates sharing across multiple Azure resources.
- Ideal for scenarios where a managed identity needs to be shared among various Azure resources, ensuring consistent permissions across the board.
Now with understanding of managed identity let’s deep dive into how we can use it to authenticate to Dataverse.
To demonstrate we will use example of Azure web application for authentication to Dataverse
Dataverse Authentication in Azure Web application using Managed Identity
Let’s consider a web application which captures leads online and saves it into Lead entity of Dataverse.
Following is sample contact us page of the website to capture the contact information of the lead.

Install these nuget packages in your web application.


and following is the simplified version of code to explain the concept, in production you may want to organize this better.


Here essentially we are using DefaultAzureCredential to get the token and which is further used to initialize the Dataverse service client. Finally using the created service client lead entity record is created.
What is DefaultAzureCredential?
In above code we used DefaultAzureCredential, which is a versatile utility in the Azure SDK for .NET that streamlines the process of obtaining authentication credentials for applications intended for deployment in the Azure environment. It automatically selects the appropriate credential type based on the runtime environment.
Supported Credential Types in DefaultAzureCredential
The following credential types are attempted, in a specific order, when using DefaultAzureCredential:
- EnvironmentCredential:
- This credential type leverages environment variables to obtain authentication information.
- WorkloadIdentityCredential:
- Workload identity credentials are used in environments like Google Cloud where Azure services can utilize Google Cloud identities for authentication.
- ManagedIdentityCredential:
- Managed identities allow applications deployed on Azure to authenticate without explicit credentials by leveraging the identity assigned to the Azure resource.
- SharedTokenCacheCredential:
- This credential type uses a shared token cache, often helpful in scenarios where multiple applications on the same machine need to share authentication tokens.
- VisualStudioCredential:
- In the development environment of Visual Studio, this credential type interacts with the developer’s credentials stored in Visual Studio.
- VisualStudioCodeCredential:
- Similar to `VisualStudioCredential`, this type is specifically tailored for use with Visual Studio Code.
- AzureCliCredential:
- The Azure CLI (Command-Line Interface) credential allows applications to use credentials cached by the Azure CLI.
- AzurePowerShellCredential:
- This credential type interacts with credentials stored by Azure PowerShell.
- AzureDeveloperCliCredential:
- Tailored for the Azure Developer CLI, this credential type retrieves credentials from the Azure CLI.
By attempting these credential types in a specified order, DefaultAzureCredential accommodates a range of deployment scenarios and developer environments. This approach provides flexibility, ensuring that applications can seamlessly authenticate across various Azure deployment contexts without the need for manual adjustments to the authentication mechanism.
For our purpose it will facilitate us to test application locally by setting up credential in Visual Studio, and then we can deploy it to Azure without changing any code.
Set up Visual Studio for local authentication to Dataverse
To test the application locally you can setup Visual Studio authentication.
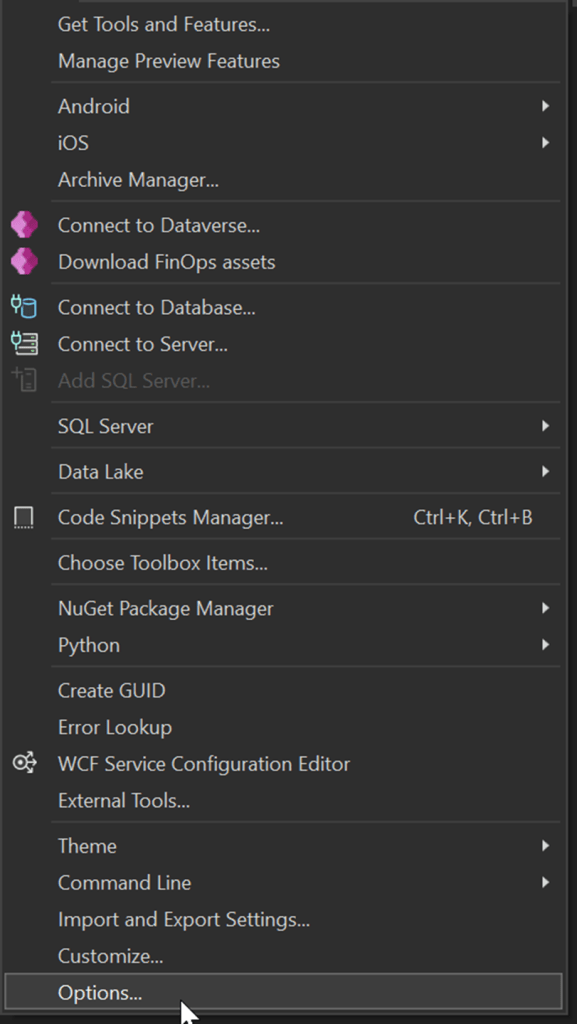
Navigate to Tools > Options
Go to Azure Service Authentication > Account Selection
Select or add the account which has the necessary permissions in Power Platform.

Click Ok
Now run the application by pressing F5, and submit the contacts us.
You will see a lead record is created in Dataverse or Model Driven App.
After testing Dataverse authentication locally let’s deploy web app to Azure
Web Application Deployment to Azure
When you have tested and ready to publish the application you can deploy it.
In production you may want to deploy using DevOps CI/CD, but to keep it simple let’s deploy from Visual Studio. Right click on the project and Publish.

If you’re deploying for the first time, follow the publish wizard.

After deploying web application to Azure we are ready to configure Managed Identity. We will see both ways that is system-assigned Managed Identity and user-assigned Managed Identity.
Azure Web App configuration with System-Assigned Managed Entity
We need to find Application ID of this web app, for that we need Object ID of the web application or application name.
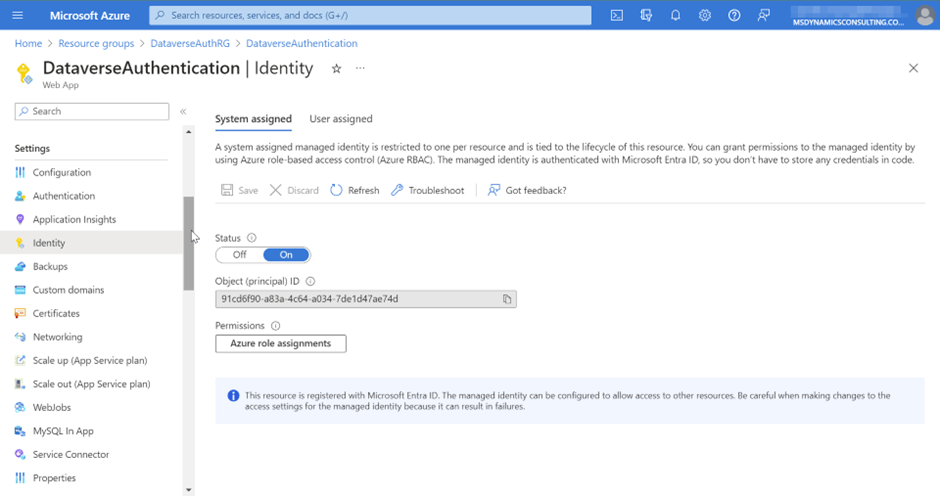
Go to the Identity blade of the web app and copy the Object ID
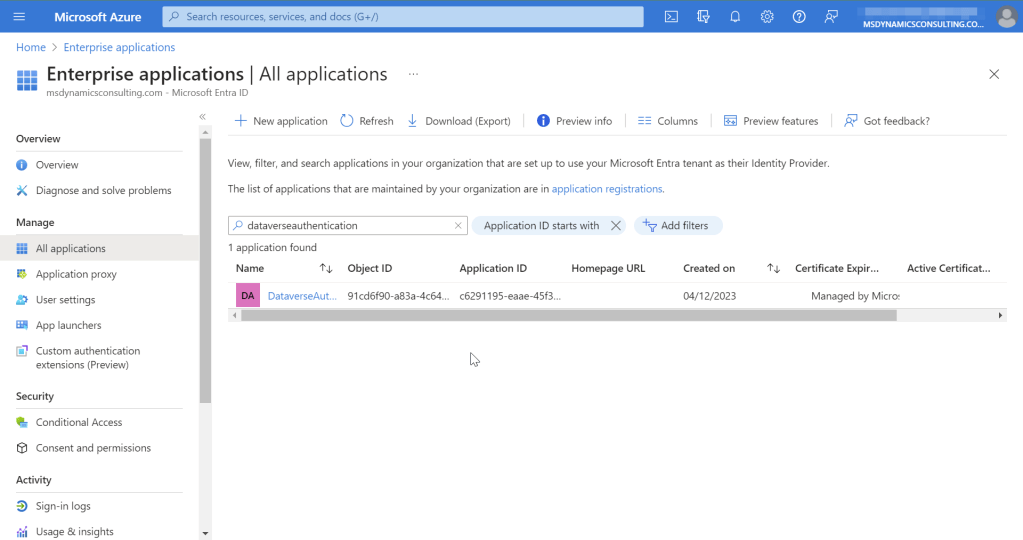
Application ID for the applications are available from Enterprise applications. Go to the Enterprise applications.

Search for web application name or the copied ObjectId and you will be able to get Application ID. Copy this Application ID, this will be needed later to register Application User in Dataverse.
Azure Web App configuration with User-Assigned Managed Identity
Now let’s see how we can configure user-assigned Managed Identity if this was the case required.
For using user-assigned managed identity first we need to create a Managed Identity, search for Managed Identities.

Click on +Create

Enter required details and create managed identity

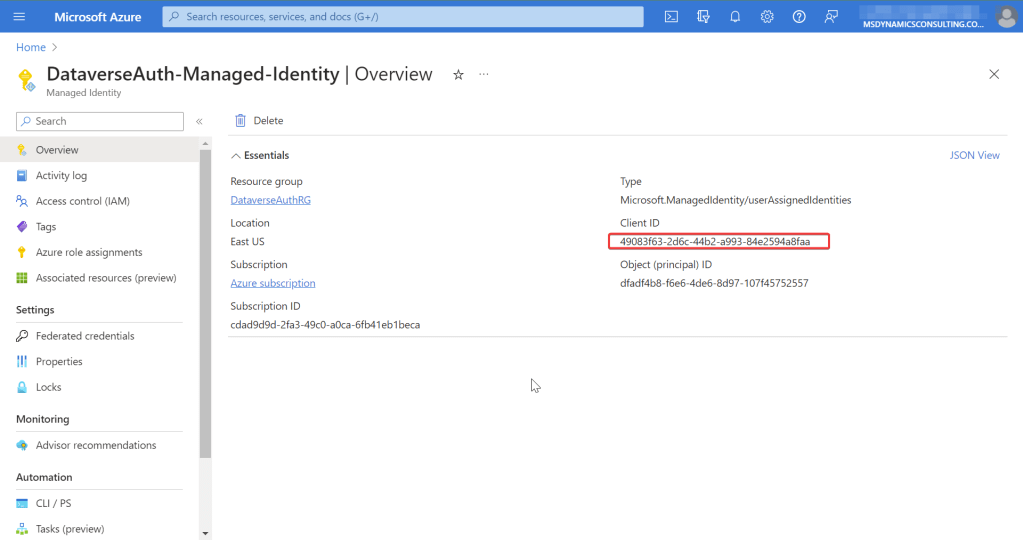
Then navigate to created User Assigned Managed Identity and copy the Client ID. This will be needed to create Application user in Dataverse.
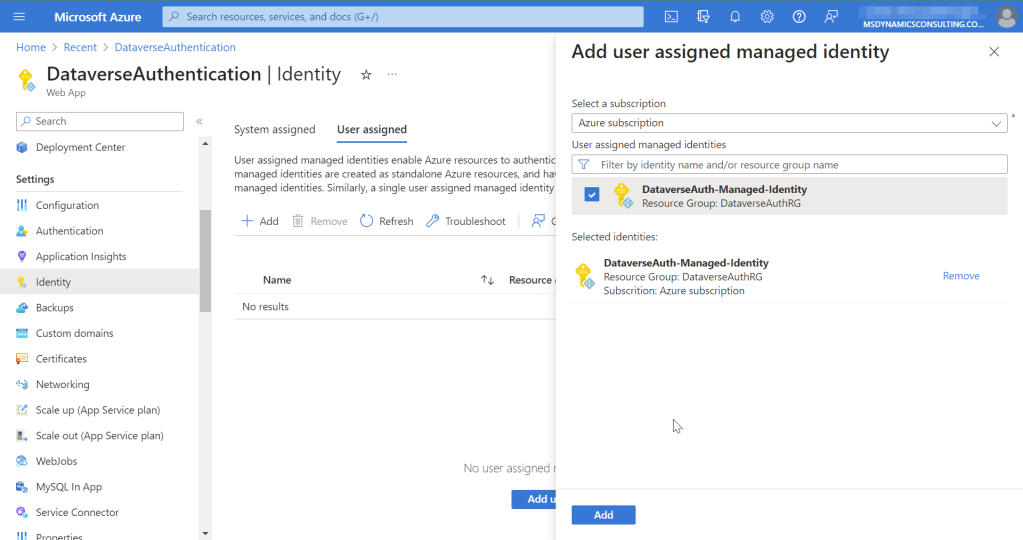
Next we need to assign this user-assigned Managed Identity to the web application so that web application can use it to authenticate to Dataverse.
Go to the Identity blade of the deployed Web application and click on User assigned.

Click on + Add, and select created user-assigned Managed Identity.
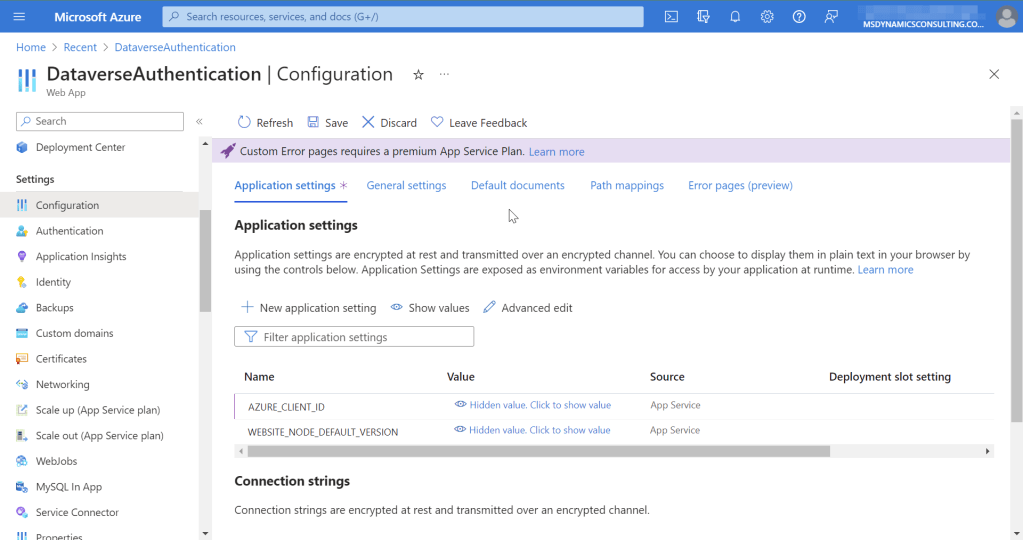
Because there can be multiple user-assigned Managed Identity assigned to the web application, we need to tell which one to use.
Go to the Configuration blade of the the web application and add new application setting AZURE_CLIENT_ID, for the value paste the copied Client ID of the user-assigned Managed Identity.
Managed Identity is configured now and ready to be used for authentication to Dataverse.
Set up Application User in Power Platform
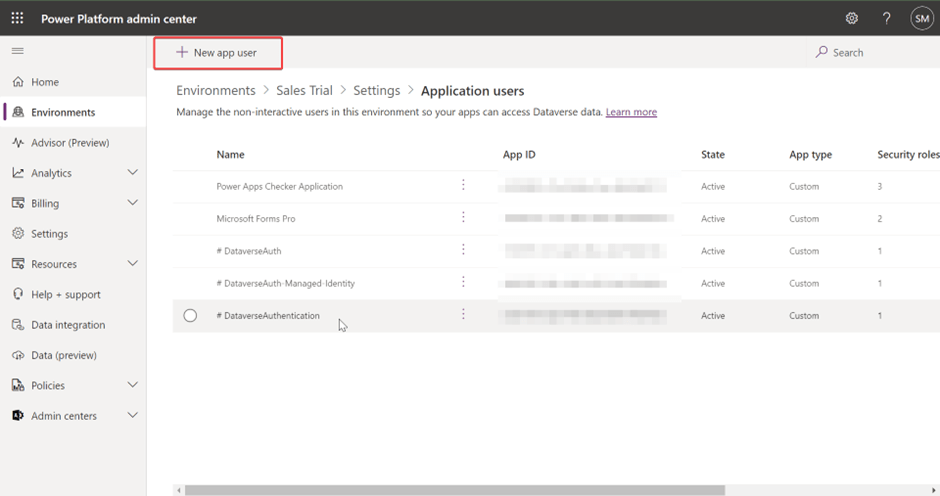
After getting the Application ID in previous steps let’s add the add application user to Dataverse.
Navigate to the environment.

Select Users

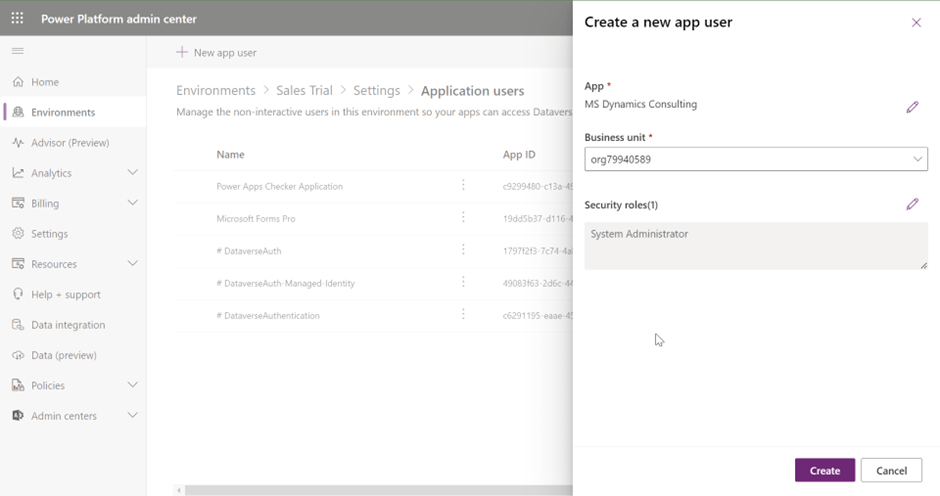
Then + New app user
Click on +Add an app

Enter the copied Application Id, and click on Add.

Select Business Unit and then select Edit icon for security role.

Select appropriate Security Role

Finally Create the Application User
Now with everything configured test the application, it should work the same way as it worked locally.
Conclusion
In essence, this guide underscores the pivotal role of managed identity authentication for secure interactions between .NET Web Apps, and Dataverse. By simplifying credential management, managed identity ensures streamlined and robust authentication.
Key takeaways include the advantages of reduced administrative effort and enhanced security, alongside insights into system-assigned and user-assigned managed identities for tailored deployments.
Practical implementation using DefaultAzureCredential and step-by-step configurations for tools like Visual Studio are covered, ensuring a secure setup for Azure Web Apps with Dataverse.
As security takes center stage, adopting managed identity authentication becomes paramount. This guide equips developers to fortify applications efficiently, navigate complexities, and innovate with confidence. Embracing managed identity authentication sets the stage for streamlined security, empowering developers to focus on driving application excellence.
We are here to help you
Discover the power of seamless Dataverse integration for your website with our expert services! As a trusted technology partner, we specialize in implementing secure managed identity authentication in .NET Web Apps and Azure Functions. Elevate your data management capabilities, enhance security, and streamline workflows by leveraging our proficiency in Dataverse integration. Let us transform your digital experience with tailored solutions that prioritize efficiency and security. Connect with us to unlock the full potential of Dataverse and fortify your online presence.